Friday, September 22, 2017

Learn Tally Developer Language (TDL, Tally Customization)


What is Tally Developer Language


Tally Definition Language is the application development language of Tally. The user interface of Tally.ERP 9 and Tally.Server 9 is built using TDL. Tally.Developer 9 is a comprehensive development environment that is designed to enable a TDL programmer to develop, build, and deploy solutions for Tally.ERP 9.

Tally.Developer 9 application which is used and helpful to develop Tally Customizations can be downloaded from https://tallysolutions.com/tally-developer9/

This application can be used in 3 modes.

1. Licensed mode :- Were we can develop or code compile it to our customer's serial numbers. So that the code is encrypted and cannot be used by anyone else apart from you and use customer (That too on the specified Tally.ERP9 Serial no. on which it is compiled). You code is encrypted and cannot be viewed without de-compiling  it  which can be only done by the person who has compiled it. Even  Tally Solutions Pvt Ltd. cannot de-compile it. And in the mode you get technical support from Tally Solutions Pvt Ltd but no Educational support which mean Tally Solutions Pvt Ltd will not tech you how to write code. 

2. Educational mode:- In this mode you can develop your code, you can attach this code to any Tally.ERP9 but you cannot compile it. So you code is open to the world and anyone can use it. In Educational mode there is no support from Tally Solutions Pvt Ltd. 

3. Evaluation Mode:- This mode is as good as Educational mode as you cannot compile your code. But you get the evaluation license free of cost. In which Tally Solutions Pvt Ltd gives you Technical Support and again Tally Solutions Pvt Ltd does not tech you how to write code.

So here we are going to learn some simple and useful tdl code writing step by step and in various posts.

Note :- It is assumed that you have downloaded Tally.Developer9 application from  https://tallysolutions.com/tally-developer9/ and it is running on your system in any one of the modes. If you are note comfortable with Tally.Developer9 you can also write your code in simple Notepad or Wordpad in you system.


Session 1.


What is the Basic Structure of Tally Development Language ?

Tally codes has to be written in a particular structure format only other wise your code with not get attached to Tally.ERP9 software and will give error. so below is the structure of TDL


[#Menu: Gateway of Tally]
      Item: First TDL: Display : My Report

[Report : My Report]
           Form : My Form

[Form : My Form]
           Part : My Part

[Part: My Part]
          Line : My Line

[Line : My Line]
          Field: My Field

[Field: My Field]
          Set as: "My First TDL"


You can attach the above code in your Tally.ERP9 application by following simple steps given in http://tallyexperttips.blogspot.in/2017/09/how-to-attach-any-tallyerp9.html

You will find that a new option will be seen on your main screen of your Tally.ERP9 software after Opening up your Tally Data. That main screen is also called as Gateway of Tally.

The new option name will be My Report which we have provided in your code

[#Menu: Gateway of Tally]
      Item: First TDL: Display : My Report

When you select that option it will show you the REPORT with a FORM in which there is PART with a LINE which contains FIELD containing My First TDL.

So I believe that you have understood the basic structure of TDL.

In Tally.ERP9 each options on the screen are or can be called MENU  which can have SUB Menus or Report. REPORT have FORM. 
FORM can have SUB FORMS or MULTIPLE PARTS. 
PARTS can have SUB PARTS or MULTIPLE LINES. 
LINES can have  MULTIPLE FIELDS 
FIELDS are in which DATA can be Punched, Viewed, Or Edited.

Note :- I am trying to write this Blog in the simplest language in which i can if you have any queries or if you do not understand you can simply post your queries or leave you email i will get back to you as soon as possible.

In Next Post I will tech now to use Tally.ERP9 in Developer mode so that we can come to know what are the name used or given by Tally Solution Pvt Ltd to there fields and How to use Tally.Developer 9 application and its benefits. 

Tuesday, September 19, 2017

Email directly from Tally.ERP9 Software (Free TDL / Tally.ERP 9 Customization

Most of us does not know that Tally.ERP9 has a In-build Feature were you can email any thing directly from Tally.ERP9 Software. Any by following simple below given steps you can achieve the same.


  • Open you Tally.ERP9 Software.
  • Open the Data in which you want to setup the Emailing Feature.
  • Press F12 and there you will find option E-Mailing.

  • Select the E-Mailing option.
  • You will be taken to above screen. Do the appropriate settings here so that Tally.ERP9 can connect to your email server and send email. Bu default Tally Company have given settings for Gmail, Hotmail and Yahoo Mail as you can see in drop down list.
  • After doing all the above setting you can send email from within Tally.ERP9 software of almost any voucher or report.

To Get Prompt of sending email after saving any voucher please add the below code and attached it to your Tally.ERP9 Software.


[#Part: VTYP BehaviourMain]

Add : Line : After : VTYP PrintSave : VCS_VTYP EmailSave

    [Line: VCS_VTYP EmailSave]

        Fields      : Long Prompt, VCS_VTYP EmailSave
        Local       : Field : Long Prompt : Info : $$LocaleString:"Email after saving Voucher ?"
        Local       : Field : Long Prompt : Width : @@LongWidth

[Field: VCS_VTYP EmailSave]

    Use         : Logical Field
    Storage     : VCS_EmailAfterSave
    Set always : Yes

[System: UDF]

   VCS_EmailAfterSave : Logical : 1500


[#Form: Voucher]

On : FormAccept : @@VCS_VTYPVCS_EmailAfterSave : Mail Report

[System: Formula]

VCS_VTYPVCS_EmailAfterSave :  $VCS_EmailAfterSave:VoucherType:##SVVoucherType


Copy this code to the notepad and save it. To attach this code in Tally.ERP 9 Software please follow the instruction on http://tallyexperttips.blogspot.in/2017/09/how-to-attach-any-tallyerp9.html

After attaching this code you will need to enable emailing in voucher type. by following below steps.

Step. 1 Open Tally.ERP9 Software.
Step. 2 Open Data in which you want to use the above customization.
Step. 3 Go to Accounts Info -> Voucher Type-> Alter.
Step. 4 Select the voucher type to which you want to get email prompt.
Step. 5 You will find one new option Email after saving Voucher turn that to yes and now it will                      prompt you to send email after saving voucher.

Monday, September 18, 2017

How to Attach any Tally.ERP9 Customization to Tally.ERP9 Software

This Post will guide you how to attached Tally.ERP9 Customization to  Tally.ERP9 Software (Locally)

 Step 1. Open Tally.ERP9 Software.

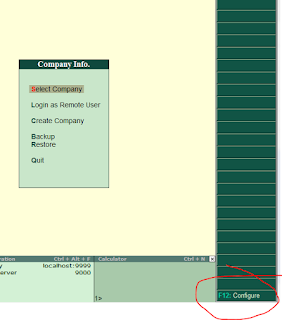
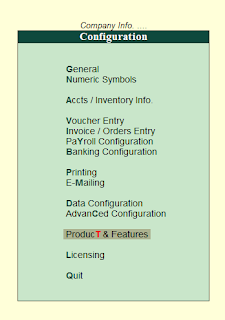
 Step 2. Press F12 and go to Product and Features Option.


Step 3. Press F4 Manage Local TDL


Step 4. Provide complete path of the tdl file with its extension as shown below.

Note:- Tally.ERP9 Software accepts the customization files with extension .txt, .tdl, .tcp


  • .txt or .tdl file extension are the file which can easily be edited in Notepad, Word pad, or Tally Developer Software.
  • .tcp file extension file are the compiled file and can only be edited by the person using the account that file was complied.


.

After Completing above steps you should be able to see below information in your Tally.ERP9.


If you see the Above screen it means that you have successfully attached the customization to Tally.ERP9 Software 

Friday, September 15, 2017

Disable / De-activate Stock Item from List (Free Tally.ERP9 TDL)

There are lot of time you cannot delete Stock Item which are already used in voucher from Tally.ERP 9 software and you want to remove that Stock Item from the list so that it is not wrongly selected during entry.

And there comes the need to Disable or De-activate that stock item from the list. Below code will help you in doing so.


Step 1. Copy the below code and past it in Notepad and save it.

Note: Files extensions which can be attached to Tally.ERP9 software are .tcp , .tdl, .txt 

[#Part: STKI Basic Features]
Add:part:After:STKI Batch:STKI Control

[Part:Stki Control]
Line:Stki Control

[Line:STKI Control]
Field:Stki Control,Stki Control1

[Field:Stki Control]
Use:name Field
Info:"De-Activate this Stock Item ?"
Width: 22
Background: Yellow

[Field:Stki Control1]
Use : Logical Field
Storage :isStockITEMcontrol
Set As : Yes
Set Always : Yes

[System:udf]
isStockITEMcontrol:Logical:3015

[System:Formula]
USEDStockitem:Not $isStockITEMcontrol

[#Collection: Vch Stock Item Extract]
Filter: usedstockitem

[#Collection: List of POSStockItems]
Filter: usedstockitem

Step 2. Open your Tally.ERP9 Software And Press F12 on your key board.

Step 3. Go to Product and Features

Step 4. Press F4 to manage local tdl


Step 5. Provide Full Path of the code file which you have saved in Step 1

Note: Files extensions which can be attached to Tally.ERP9 software are .tcp , .tdl, .txt

Step 6. If you see tdl loaded on below screen it mean you have successfully attached the code.

Step 7. Open your company in which you want to disable or de-activate Stock Item.

Step 8. At Gateway of Tally Screen ( Main Screen after opening Tally.ERP9 Software). Go to                          Inventory Info.

Step 9. Select Stock Item then select Alter then from the drop-down list select the stock item which                you want to disable/de-activate.

Step 10. You will find one new option "De-Activate this Stock Item ?" turn that option to YES and                    your stock item will get disabled from Tally.ERP9 software.


Note:- By doing this you are only hiding the stock item from the list but it will be there in your 
           Tally Data. And all the Data related to it will still be there. 
           To Actually delete that stock item from your Tally Data you will need to delete all the voucher            related to that stock item which you want to delete 
                             or 
           Edit those voucher and select different Item in place of that stock item and then Tally.ERP9               software will allow you to delete that Stock Item.

How to auto back up your Tally.ERP9 or any data using Cobian Backup?

Cobian Backup is a simplified approach to back up and restore your data in a scheduled manner. You can connect the application to a domain or a local system account and schedule the execution of the backup process as per your set up.

The following is the detailed procedure for installing and setting up  Cobian Backup.

Step 1: Downloading Cobian application 

Click here to download the application. The whole setup is around 18.7 MB. Save the .exe in any of the local drives.

Step 2: Installing Cobian application

1.     Double-click cbSetup.exe, and click Run.
2.     In the setup window, click Next.
3.     Click I accept the conditions, and then click Next.
4.     Type or locate the installation path, and click  Next.
5.     Under installation type select As a service.
6.     Under service options:
      If you are on a domain, select Use a regular account and provide your Username and Password to prevent any Domain controller restrictions.
      If it is a stand-alone PC, select Use Local System account.
7.     Click Next.
8.     Click Yes to continue.
9.     Click Install.
10.  Once installation process is complete, click Done.

Step 3: Setting up backup 

1.     Open the application.
2.     Click Task and select New task or press Ctrl+A.
3.     Under the General tab, enter Task name (for example, Backup001) and click Files.
4.     Under Source, click Add, select Filesdirectory, FTP or manual from the list. Select the folder where Tally data is saved; for example, C:\Tally.ERP9\Data.
5.     Click Destination and select the path where the data needs to be saved. Select any existing folder or create a new folder, and click OK.
6.     Click the Schedule tab.
You can schedule the frequency of the backup with different intervals. Choose the schedule depending up on the updates you need.
7.     Click the Dynamics tab.
Select number of backups you need under Full copies to keep. For instance if you backup daily, you can keep last 3 backups – but again it depends upon your need.
8.     Click the Archive tab.
Select the compression type; that is, you can use Zip, 7zip, or No compression.
Note: 7zip provides better compression.
You can encrypt files up to AES 256 bits.
9.     Click the Filter tab.
You need to filter the choice; that is, a specific set of files, File size, Date Modified, and so on.
You can exclude files (*.tsf) from scheduled backup. User can continue accessing the data during the backup process.
10.  Click Add and browse for .tsf files from Tally Data folder. Next, click OK.
Note:  During Backup process no need to stop working on Tally Since the tsf files are already excluded
11.  Click the Advanced tab and enable required options as per your need.
12.  Click OK.
As per the scheduled time, day and date, backup will take automatically. Cobian application shows the backup status and backup size as shown below:
Backup taken from Cobian application to the destination location will appear as shown below.
13.  In order to restore the data, right-click the data backup (taken from Cobian application), and then click 7-Zip > Extract here.
The data is extracted in the folder with the same naming convention used in Tally.ERP9 (for example, 10000, 10001).

Thursday, September 14, 2017

How to Correct GSTR-3B?

The deadline for filing the first GST return, the Form GSTR-3B ended last month on dates August, 25 and August, 28, 2017. Yet, there are many businesses which are still in the process of filing Form GSTR-3B. This being the first GST return and understating the plight of the businesses, the committee has decided to waive the late fee for all the businesses who could not file GSTR-3B for the month of July 2017. However, for late payment, an interest at maximum of 18% will be levied.
Form GSTR-3B is the first return, some mistakes or errors are expected in its filing process. Few examples are listed below.
  • “I missed out on adding some outward supplies before arriving at my Outward Supplies Summary and thereby shown less tax liability. How can this be corrected?”
  • “I skipped adding tax liability on account of inward supplies liable for reverse charging.”
  • “ITC is declared less in Table 4 of Form GSTR-3B.”
  • “There is excess claim since I missed out to reverse the ITC.”…. and so on.
No matter what the reason for mistakes, the important question is – “How to correct GSTR-3B?” How to change the details in GST-3B?
No concept of revised return in GST
Businesses need to take note of the fact that under GST, there is no concept of revised return, whether for Form GSTR-3B or your regular return which you will be filing from September onwards. This means, once you have submitted the return in the GSTN portal, you cannot modify it. The same holds good for Form GSTR-3B as well. As long as the form is in save mode (before submitting), details can be modified and corrected, but not after submitting it.
How to correct GSTR-3B?
You need not worry about this!
As you know, the Form GSTR-3B is only an interim return and the actual return for July needs to be filed in Form GSTR-1 by 10 October; Form GSTR-2 by 31 October ; and Form GSTR-3 by 10 November, 2017 (revised dates). Therefore, any correction in GSTR-3B have to be reported in Form GSTR-1 and Form GSTR-2.
Any correction related to outward supplies has to be reported in Form GSTR-1. Outward supplies might have been under-reported or excess reported in FORM GSTR-3B, both of which need to be correctly reported when filing Form GSTR-1.
Similarly, any correction towards the eligible ITC, tax liability of inward supplies liable for reverse charge; or any other correction in the details of inward supplies submitted in the Form GSTR-3B, need to be reported in Form GSTR-2.
Based on the correct details declared in the Form GSTR-1 and Form GSTR-2, the revised tax liability and eligible ITC will reflect your e-ledger. Also, these details will get auto-populated in Form GSTR-3 of July 2017.

Tuesday, September 12, 2017

View HSN code of Stock Item During Entry ( Free Tally.ERP9 TDL)

To View HSN code of the stock Item during Sale or Purchase Entry. Please follow the below steps.

Just copy the below code and paste it to the notepad file and save the file with .tdl or txt extension and follow the below steps.


[#Line : EI Column One]
Add : Right Field: At Beginning:OTSHSNCode

[Field:OTSHSNCode]
Use:Name Field
Set as: "HSN Code"
Skip: Yes
Border:Thick Left Right
Width:10
Align: Center

[#Line : EI Inv Info]
Add: Right Field:At Beginning:OTSHSNCodeNo

[Field:OTSHSNCodeNo]
Use: Name Field
Set as: $$GetGSTItemDetails:$StockItemName:$date:"HSNCode":0:"StockItem"
Width:10
Align: Center
Set Always: Yes
        Skip: Yes


 Step 1. Open Tally.ERP9 Software.

 Step 2. Press F12 and go to Product and Features Option.


Step 3. Press F4.


Step 4. Provide complete path of the tdl file with its extension as shown below.

.

After Completing above steps you should be able to see below information in your Tally.ERP9.


This means that your customization is successfully attached now you can go to sales or purchase screen and you will find one new column which will automatically show the HSN code on Item selection.

Note:- This has being tested on Release 6.1 and HSN code were provided at stock item Level


Reverse Charge for Inward Supply of Services


To record a purchase entry
1.    Go to Gateway of Tally > Accounting Vouchers > F9: Purchase.
2.    Enter the details as required.
3.    Click A: Tax Analysis > F1: Detailed to view the detailed Tax Analysis report that displays the reverse charge amount.


4.    Press Escape (Esc) to go back to the purchase voucher.
5.    Press Ctrl+A to save.

Recording a journal voucher to raise the tax liability

To record a journal voucher to raise the liability
1.    Go to Gateway of Tally > Accounting Vouchers > F7: Journal.
2.    Click J: Stat Adjustment.
3.    Select the options as shown below:

       
4.    Debit the expense ledger, or the ledger grouped under Current Assets and credit the GST ledgers.


5.    Press Enter to save.


Reverse Charge Accounting for Inward Supply of Goods

Configuring stock item


You can configure the stock items for reverse charge applicability.

To configure your stock item
1.    Go to Gateway of Tally > Stock Items > Alter > select the stock item.
2.    GST Applicable? - Applicable.
3.    Set/alter GST Details? - Yes. In GST Details screen:
     Taxability - Taxable.
     Is reverse charge applicable? - Yes. Press F12: Configure and set Enable reverse charge calculation? to Yes.

     Enter the GST rates.
4.    Press Ctrl+A to save.

Inward Supply of Goods under Reverse Charge

You can create invoices to track the purchase of stock items attracting reverse charge.
To record a purchase entry
1.    Go to Gateway of Tally > Accounting Vouchers > Accounting Vouchers > F9: Purchase.
2.    Enter the details as required.

3.    Click A: Tax Analysis > F1: Detailed to view the detailed Tax Analysis report that displays the reverse charge amount.
4.    Press Escape (Esc) to go back to the purchase voucher.
5.    Press Ctrl+A to save.

Thursday, September 7, 2017

How to Upgrade your Tally.ERP9 to Latest Version/Release

Note:- Before upgrading your Tally.ERP9 application it is highly recommended to take a back-up of your Data.

Method 1


Step 1: Open your Tally.ERP9 application. At the bottom of your application you will find below screen were it will show on what version/release at you are and what is the latest version/release  is available for installation


Step 2: Click on the available version/release ( if showing ). And it will take you to below screen.


Step 3: Press down arrow to select the Available(Latest) And Click on the Update Button on the right hand side pane.


It will Automatically Install the selected version/release and your Tally should restart. And you are upgraded to Latest version/release.


Method 2

 Step 1: Go to https://tallysolutions.com/download/ and download the latest version/release

 Step 2: Double click in the setup.exe which is download from the url. And it should take you to below screen.


Step 3: Select the folder in which your previous Tally.ERP9 is installed. By clicking on 3 dots.


and you should see a a slight change in the installation screen which is highlighted below. The New Installation word will change to Upgradation.


 Step 4: Now click in Install  and Installation process will being and  the end click of done. And now you will have your Tally.ERP9 application to latest version/release

Import from Excel GSTIN No in Tally (Free Tally Customization/ Free TDL)

The Import Party GSTIN add-on helps you update GSTIN details of all parties at once from Microsoft Excel. It is very useful if you have the GSTIN information of all parties outside Tally.ERP9 and want to import the information to update the party ledgers in Tally.ERP9

Download the Import Party GSTIN add-on from the Add-ons section at
https://tallysolutions.com/gst-preview-release/

Note: You need to export existing party information to MS Excel using Update Party GSTIN, and use this MS Excel file to fill in the GSTINs that you want to import.

To install the Import Party GSTIN add-on

1. In Tally.ERP 9, click F12: Configure > Product & Features > F4: Manage Local TDLs.

2. In the TDL Configuration screen, set the option Load TDL files on startup to Yes.

3. Specify the name of the add-on with the folder path containing the add-on in the field List of TDL files to preload on startup.

4. Press Enter to save.

Import Party GSTIN appears under GST Reports.


To import party GSTIN details

1. Go to Display > Statutory Reports > GST > Update Party GSTIN.

2. Select All Items in the Name of Group and Name of Ledger fields in Select Group screen and press Enter. The Update Party GSTIN/UIN screen lists all parties without a GSTIN.

3. Click Export to export the information in excel format.

4. Open the exported file, specify GSTIN details for the parties, and save the file.

5. In Tally.ERP 9, go to Display > Statutory Reports > GST > Import Party GSTIN.

6. Specify the name of the MS Excel file to be imported with the path in the field Name of the file to be imported (Excel).

7. Specify the name of the sheet containing information in MS Excel file in the field Sheet name.
8. Press Enter to import.

When the import is completed, the MS Excel file opens and displays the message Data imported successfully.

Note: Ensure the party names are not altered in the MS Excel file exported from Tally.ERP 9. Also, the name of Country, State and Registration Type specified in the MS Excel file must match the spellings given in Tally.ERP 9.


To correct errors in the imported data


1. Open the MS Excel file and check for a sheet called Errors. If this sheet is there, it means that some data was incorrect for some parties and has not been imported into Tally.ERP 9.

2. Check and make necessary corrections in the Errors sheet. Save the file.

3. Import the file again, and specify the sheet name as Errors. The corrected information is imported this time.


Tuesday, September 5, 2017

Exporting GSTR-1 from Tally.ERP9

You can export your GSTR-1 data either in MS Excel or CSV format. Before exporting GSTR-1, resolve the exceptions in your transactions by going to the Summary of Exceptions (GSTR-1)

To export GSTR-1


1.    Go to Gateway of Tally > Display > Statutory Reports > GST > GSTR-1.
2.    Select the period for which returns need to be filed.
3.    Press Ctrl+E.
Note : The Format is set to Excel (Spreadsheet by default. To Change the format, select CSV (Comma delimited on the Export Report screen.
4.    Specify the Export Location and Output File Name.
5.    Press Enter to export.
If you have selected the CSV format, Tally.ERP 9 will create separate CSV files for each table in GSTR-1. These files need to be imported into the offline tool.
Note: If the data exported to MS Excel has $ symbol, or if the values are not appearing, generate CSV file and import it into the offline tool,

Resolving No. of voucher with incomplete/mismatch in information. (GSTR-1) in Tally.ERP9

Open Tally.ERP9 Application and open the company From Gateway of Tally (Main screen after company opens up) Go to Display ( Press D) -> Statutory Reports (Press O) -> GST (Press G)-> GSTR-1 


If a voucher has multiple exceptions, on resolving one exception it will move to the next exception category until all exceptions are resolved and entries moved to Included in Returns.


To resolve all exceptions
1.    Drill down on No. of voucher with incomplete/mismatch in information.

2.    Select any transaction and press Enter.


3.    Select or enter required information for the first exception type. Further, you can click F5: Recompute or A: Accept as is to recompute or accept the details, respectively.

4.    Repeat steps 1, 2, and 3, until all exceptions are resolved.

Note :X: Exclude Vouchers in the Exception Resolution screen to exclude the voucher from GSTR-1 return.